It was about time I geeked it up and setup a DIY media centre for my home. I decided to go for the cheap and cheerful hardware option to power my media centre: Raspberry Pi. Only £25 (for the actual computer)! This post shares part 1 of my journey of setting up a choice raspberry pi media centre: from the research to the implementation and retrospection. I’m very happy with the results.
Note: I bought the revision 2/model B (512 Mb RAM) version of Raspberry Pi.
Choosing the SD Card

After countless hours researching on the internet for which SD cards are the best with Raspberry Pi, I finally reached a decision: “SanDisk 16GB 45MB/s Extreme SDHC Card (SDSDX-016G-X46)”. Most forums and guides will say you should spend the extra cash on the class 10 speed cards over lower class cards, this will give you a nice (and much needed) performance boost all round. But choosing the highest read/write speed cards doesn’t necessarily mean they will out perform lower speed cards during the typical workload of a Raspberry Pi session. Some key points to keep in mind when deciding on an SD card are:
- Read/write speed ratings on SD Cards refer to sequential read throughput. This is great if you think you will be running applications that load/save large chunks of data on the SD card (e.g reading videos from the SD card).
- My media centre doesn’t have a requirement to perform these types of operations on the SD cards: like most people videos for my media centre will reside on an external storage (SD cards have limited storage).
- Typically computers will randomly access the storage device hosting the OS and personal document space (especially when reading/writing to the swap space). So what we really want to look for is throughput based on random access tests.
- Raspberry Pi’s SD interface limits the sequential read/write speeds anyway. I’ve only found (from my personal research) that the max read/write throughput is about 2oMB/s on the Pi.
- Checkout this (outdated) article to give you an idea of all the different metrics to evaluate SD card performance: http://www.tomshardware.com/reviews/sdxc-sdhc-uhs-i,2940-9.html. Take note of the speed classes and how they perform differently for different read/write tasks.
- Make sure your chosen SD card is compatible with Raspberry Pi, and the particular OS(s) you are planning to install. Refer to this site: http://elinux.org/RPi_SD_cards
- Go for UHS cards, a recent development in SD technology that is kicks ass: http://www.transcend-info.com/Press/DrT.asp?axn=Detail&PrsNo=115&NewsKeyWd=&Func1No=3&Func2No=211
- Cheaply manufactured SD cards aren’t built for continuos random read/writes, and so they tend to break (there are some tricks to increase the lifetime of your SD card by configuring the OS, covered in part 2 of this series).
My personal choice was the “SanDisk 16GB 45MB/s Extreme SDHC Card (SDSDX-016G-X46)“, because it ticked all the boxes: UHS-1, 10-Class; 16GB will be more than enough space; and Compatibility (tested ok with both Raspbian and openELEC). Plus I stumbled on this (recent enough) great benchmark review with android: http://www.androidcentral.com/sd-card-showdown-testing-sandisk-extreme
Peripherals
I outlawed buying a conventional PC keyboard and mouse for the raspberry pi because A) it would detract away from its home-media-centre feel, B) it would look lame, and C) it would be just too inconvenient to handle a keyboard and mouse on a couch. I turned to all-in one wireless keyboard and tracker devices.
The long short of my search led me to two competing devices: the “Rii 2.4GHz Wireless Mini PC Keyboard Touchpad“, and the “Logitech K400 Wireless Touch Keyboard“. The winner: Logitech K400.
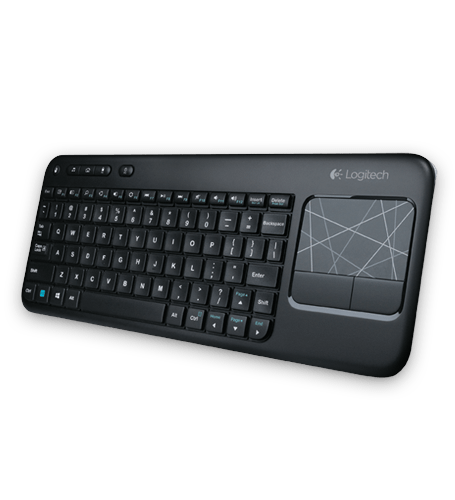
The Rii mini just seemed too small and a lot of reviews complained about its poor range (can stubble to get more than 1m in some cases). The K400 has a whopping 10m range with good reviews (working with raspberry pi). Also the K400 size is perfect: smaller than a conventional computer keyboard but not too small.
Power and USB
The Raspberry Pi requires at least 700mA of power to run. But once you start attaching other USB devices that don’t provide their own power source, you won’t have enough power to run your rig. What is the solution? Buy a USB hub powered using its own power source. Some key points to think about while you shop for your USB Hub:
- Not all USB hubs work with Raspberry Pi. Refer to http://elinux.org/RPi_Powered_USB_Hubs for a verified compatibility list.
- You can use the USB hub to power your Raspberry Pi so you only have a single power plug for the whole rig. This is a nice and tidy option. If you choose to power the Pi via the USB then consider:
- Ensure the power adaptor provides enough amps for the pi + all additional devices.
- Keep away from USB hubs that supply back-voltage. These hubs will back-power the Pi by supplying power through the connected USB port. This is dangerous because unlike the micro-USB power input on the Pi, the normal sized USB ports are not protected by a fuse. So if your USB hub has a upstream back-voltage then you need to ensure it will have some sort of fuse between the USB hub and the Pi, otherwise your Pi with Fry.
The PiHub is a great option because it’s supported by the Raspberry Pi Foundation (no worries about compatibility and quality), the proceeds go toward the foundations development, and it powers the Pi with all USB devices with a single powerful power adaptor.

I didn’t choose PiHub because its damn ugly. Too much of an eyesore for my lounge. In the end I went for the pluggable 7-port USB 2.0 hub - because of its ample power supply, copious amounts of positive reviews with Raspberry Pi, doesn’t look as ugly as PiHub, and it doesn’t have back-voltage on upstream connection.
Also since I already owned a Pi power adaptor I kept using it for powering the Pi (so I have two power supplies for my rig). This probably a bit overkill but there is practically no risk of under supplying the Pi when adding extra devices to my USB hub. All the coords from my Pi are hidden at the back of the TV: so the extra coord clutter is out of view.
Look out for my second part to this series!
Filed under: Uncategorized

